Generating binding projects
In order to integrate Batch with Xamarin, you will need to generate binding projects.
First of all, install a copy of Xamarin (or Visual Studio for Mac) which supports at least Android 8.0 and iOS 11. To generate the iOS binding, you will also need Xcode 12 or higher.
Create a new Xamarin project. You can name it however you want. In this guide, we will use "BatchDemo". These instructions are written for Visual Studio Community for Mac, so your experience might differ a little if you are using Visual Studio on Windows.
You should end up with a solution that has three projects:
- BatchDemo
- BatchDemo.Android
- BatchDemo.iOS
Note: In this tutorial, we will bind Batch for iOS and Android separately. Any API call made by your app will be have to be implemented for both platforms.
Android
Generating the base Android binding project
First, get Batch's AAR on our download page .
Then, follow Xamarin's AAR binding tutorial using that AAR, right until "Accessing .AAR types".
Rather than making a new solution, add the binding project to the current solution by right-clicking it, and selecting "Add > Add New Project".
We will call the project BatchSDK.Android.
You should end up with a binding project referenced by your Android Xamarin Forms project.
It will have several errors and warnings on compilation, which will be fixed by tweaking how Xamarin generates the bindings.
Fixing build issues
From the Transforms folder, open Metadata.xml, and replace it with this:
<?xml version="1.0" encoding="UTF-8"?>
<metadata>

    <!-- CS0109 should be ignored: https://bugzilla.xamarin.com/show_bug.cgi?id=58932 -->

	<!-- CS0618 should also be, since Batch internally use deprecated stuff for compatiblity -->

    <attr path="/api/package[@name='com.batch.android']"
        name="managedName">BatchSDK.Android</attr>

	<attr path="/api/package[@name='com.batch.android']/
        interface[@name='BatchInboxFetcher.OnNewNotificationsFetchedListener']/method[@name='onFetchSuccess']"
        name="argsType">FetchNewNotificationsSuccessEventArgs</attr>

    <attr path="/api/package[@name='com.batch.android']/
        interface[@name='BatchInboxFetcher.OnNewNotificationsFetchedListener']/method[@name='onFetchFailure']"
        name="argsType">FetchNewNotificationsFailureEventArgs</attr>

    <attr path="/api/package[@name='com.batch.android']/
        interface[@name='BatchInboxFetcher.OnNextPageFetchedListener']/method[@name='onFetchSuccess']"
        name="argsType">FetchNextPageSuccessEventArgs</attr>

    <attr path="/api/package[@name='com.batch.android']/
        interface[@name='BatchInboxFetcher.OnNextPageFetchedListener']/method[@name='onFetchFailure']"
        name="argsType">FetchNextPageFailureEventArgs</attr>

    <remove-node path="/api/package[@name='com.batch.android']/class[@name='Config']/field" />

	<remove-node path="/api/package[@name='com.batch.android']/class[@name='BatchUserProfile']/method[@name='a']" />

	<remove-node path="/api/package[@name='com.batch.android']/class[@name='BatchUserProfile']/method[@name='b']" />

	<remove-node path="/api/package[@name='com.batch.android']/class[@name='BatchUserProfile']/method[@name='c']" />

	<remove-node path="/api/package[@name='com.batch.android']/class[@name='h']" />

	<remove-node path="/api/package[@name='com.batch.android']/class[@name='BatchPushReceiver']" />

	<remove-node path="/api/package[@name='com.batch.android']/class[@name='Batch']/method[@name='a']" />

	<remove-node path="/api/package[@name='com.batch.android']/class[@name='Batch']/method[@name='b']" />

	<remove-node path="/api/package[@name='com.batch.android']/class[@name='Batch']/method[@name='c']" />

	<remove-node path="/api/package[@name='com.batch.android']/class[@name='BatchPushPayload']/method[@name='a']" />

	<remove-node path="/api/package[contains(@name, 'com.batch.android.') and not(contains(@name, 'com.batch.android.json'))]" />

	<remove-node path="/api/package[@name='com.batch.android']/class[@name='h.1']" />

	<remove-node path="/api/package[@name='com.batch.android']/class[@name='MessagingActivity.1']" />

	<remove-node path="/api/package[@name='com.batch.android']/class[@name='BatchInboxNotificationContent']/constructor[@name='BatchInboxNotificationContent']" />

</metadata>
You may ignore the following warnings for the whole project:
- CS0109, as this is a Xamarin bug: https://bugzilla.xamarin.com/show_bug.cgi?id=58932
- CS0618, since Batch internally use deprecated APIs to maintain our compatibility layer
To do so, open BatchSDK.Android's options, go to Build > Compiler, and add ;CS0109;CS0618 in Suppress warnings.
Then, build the solution. Everything should build without errors or warnings.
Batch's Android APIs will now be available under BatchSDK.Android once you add that project to your existing solution and reference it. Note that you will still need to follow our Android documentation, including adding the Play Services library (with its gcm and instanceid components) and required entries to your manifest.
iOS
Creating the base iOS binding project
Batch versions lower than 1.17.0 are not supported by this tutorial
First, create a new iOS Bindings Library project in your solution. You can call it BatchSDK.iOS. Reference it from your Xamarin forms iOS project.
Then, get Batch's framework binary from our GitHub releases page, and copy Batch.framework from the Batch.embeddedframework in your BatchSDK.iOS project folder.
Here is how your folder hierarchy should look like:
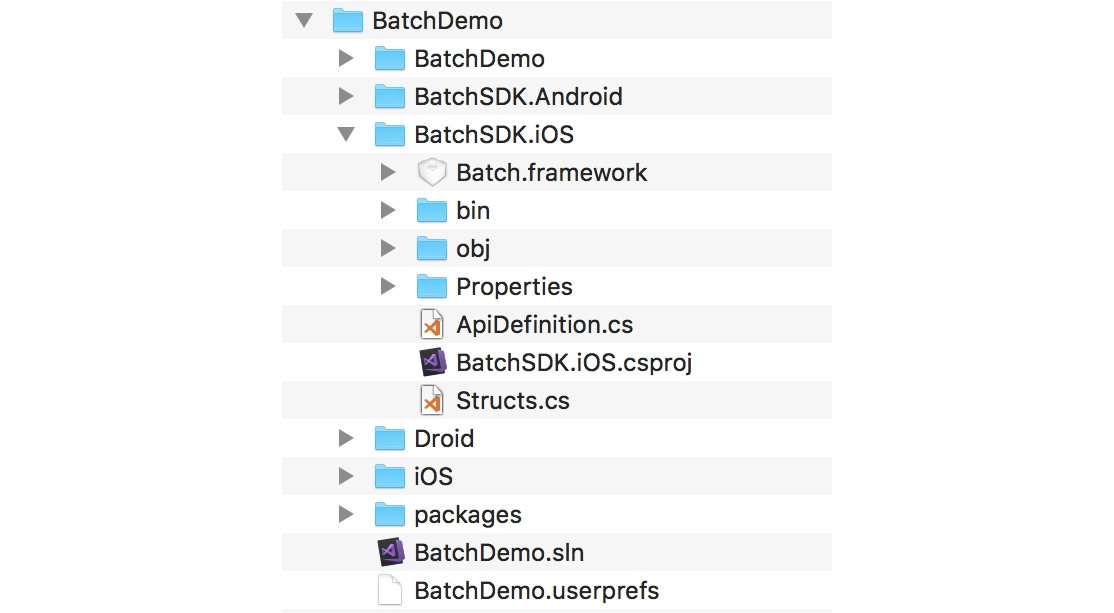
Right click on Native References in Visual Studio for Mac, select Add Native Reference and pick Batch.framework.
Finally, select ApiDefinition.cs and Structs.cs, right click and select Remove. When asked, select Delete: these are unneeded files that you are going to generate with objective sharpie.
You are now ready to go ahead and generate the actual bindings with Objective Sharpie.
Using Objective Sharpie
Download and install Objective Sharpie from Xamarin's website.
Then, open a terminal in the BatchSDK.iOS folder and run the following command:
sharpie bind -framework ./Batch.framework -sdk=iphoneos -namespace=BatchSDK.iOSIf sharpie throws an error about a 'iphonesdkXX.X' not being installed, temporarily delete/rename Batch.framework/Info.plist
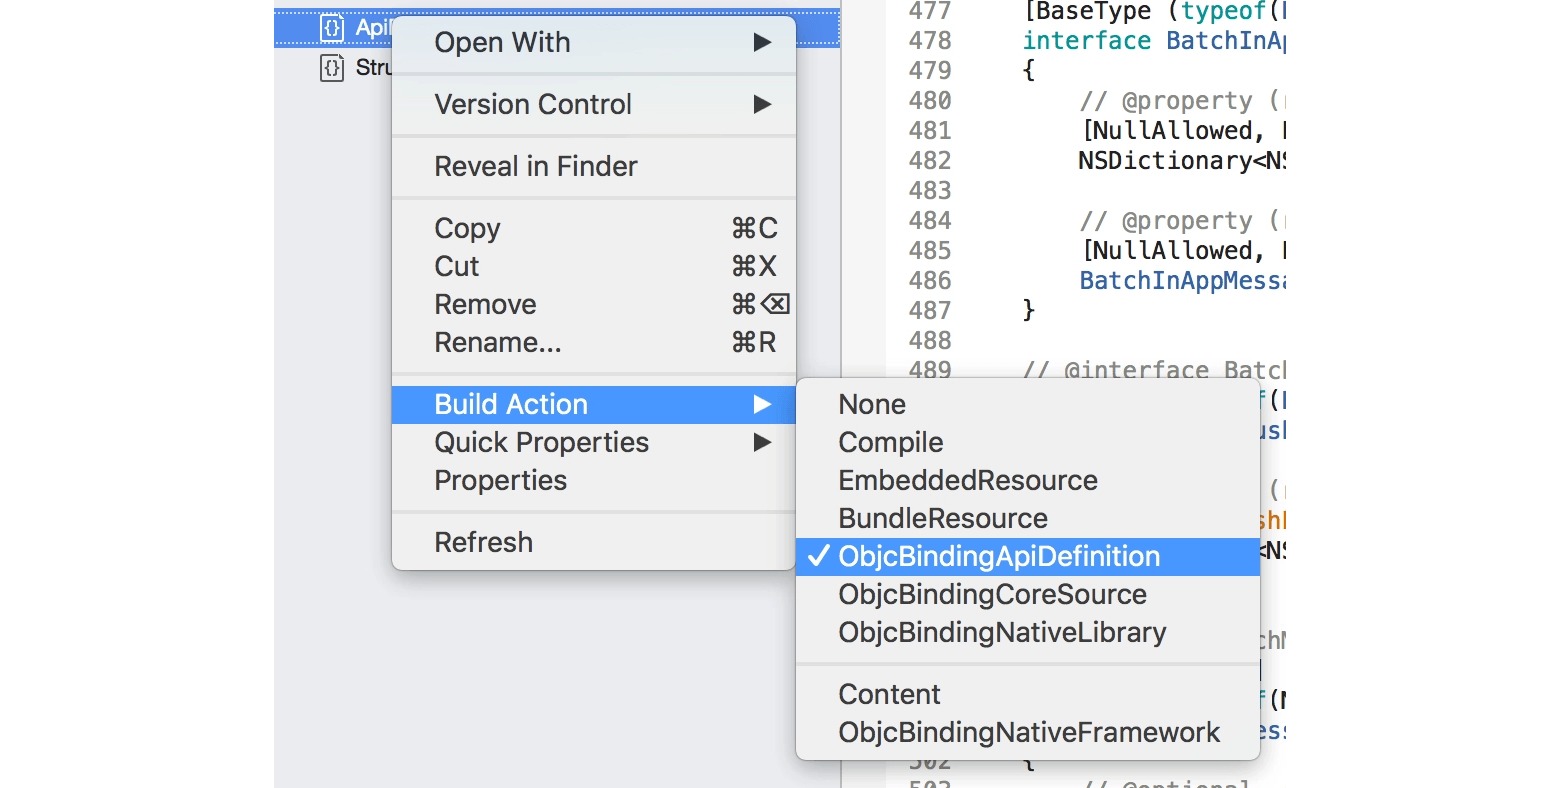
Go back to Visual Studio for Mac, right click on the project, and select Add Files.
Pick the newly generated ApiDefinitions.cs and StructsAndEnums.cs from the project directory, and confirm.
For both files, you will need to change the build action.
Right click on them, and under Build Action, select:
ObjcBindingApiDefinitionforApiDefinitions.csObjcBindingCoreSourceforStructsAndEnums.cs
Patching the API definitions
At that point, the project will still not build correctly. You will need to patch the API definitions. Since Objective Sharpie is imperfect, a couple of patches are required to the generated files to build the bindings.
In both files, search for [iOS (8, 0)], [iOS (8,0)] or [iOS (10,0)] and remove those lines.
In ApiDefinitions.cs:
-
Remove
using Batch;andusing ObjectiveC; -
Remove the following constants:
double BatchVersionNumber { get; }byte[] BatchVersionString { get; }
-
Search for every interface extending an interface starting with
IBatch...., and remove theI. Objective Sharpie does not consistently name the interfaces. For example,interface BatchManualUserActionSource : IBatchUserActionSourcebecomesinterface BatchManualUserActionSource : BatchUserActionSource
Building the solution and looking at the errors might help you find these problems. Searching for: IBatchand replacing with: Batchshould do the trick. Do the same for, IBatch, replacing it with, Batch. -
Remove all
[Verify (ConstantsInterfaceAssociation)]lines.
You will get errors on any static[Static]attribute onpartial interface Constants. Remove them all, except for the first: it is a partial class that can only have the attribute defined once. -
Add
: INativeObjectto the following interfaces:BatchUserAttributeBatchInboxNotificationContent
-
Look for anything annotated with
[Verify (MethodToProperty)]. You will need to remove those, and fix the definition accordingly.
Here are a couple of known fixes:BatchMessage PopPendingMessage { get; }->BatchMessage PopPendingMessage();bool ShowPendingMessage { get; }->bool ShowPendingMessage();BatchInboxFetcher Fetcher { get; }->BatchInboxFetcher Fetcher();BatchUserDataEditor Editor { get; }->BatchUserDataEditor Editor();UIViewController PresentingViewControllerForBatchUI();
-
Most definitions are correct, and just need their
Verifyremoved. Example:bool IsRunningInDevelopmentMode { get; }BatchUserProfile DefaultUserProfile { get; }string LastKnownPushToken { get; }string InstallationID { get; }bool IsDismissAction { get; }bool IsOptedOut { get; }- Every
BatchUserAttributegetter - Every
BatchUsergetter, except forEditor
-
Change the the
NullAllowedattribute toreturn:NullAllowedand splitExportinits own attribute on:PopPendingMessage()PresentingViewControllerForBatchUI()
-
Add the
[BaseType (typeof(NSObject))]annotation oninterface BatchEventDispatcherPayload.
In StructsAndEnums.cs:
- Remove all
[Verify (InferredFromMemberPrefix)]lines.
The project should now build correctly.
iOS - Rich notifications setup
Rich Push notification support on iOS is implemented using a Notification Service Extension.
As this is a separate executable, you need to integrate a specialized component of Batch specifically made for Extensions: BatchExtension. It is a light framework designed to minimize the size and load time of extensions.
BatchExtension isn't available in a precompiled form, you will need to compile it before binding it.
This has been tested using Visual Studio for Mac 2022. These steps might not work with VS 2019 or on Windows.
Create the extension binding project
Open Visual Studio and create a new bindings project in your solution (iOS -> Library -> Bindings Library). Name it BatchSDK.iOSExtension.
Delete ApiDefinition.cs and Structs.cs.
Finally, add a reference to it in your application project.
Setting up the Carthage-based build system
First, install Carthage.
Then, open up your Xamarin solution folder and create a CarthageDeps folder.
In that folder, create these three files:
Cartfile:
github "BatchLabs/Batch-iOS-SDK-Extension-ObjC"build.sh:
#!/bin/bash
carthage update --use-xcframeworksgenerate_bindings.sh:
#!/bin/bash
cd ../BatchSDK.iOSExtension
sharpie bind -framework ../CarthageDeps/Carthage/Build/BatchExtension.xcframework/ios-arm64_armv7/BatchExtension.framework -sdk=iphoneos -namespace=BatchSDK.iOSExtension
Then, make the scripts executable:
chmod +x build.sh generate_bindings.shFinally, run build.sh and then generate_bindings.sh. In the future, if you need to update/rebuild the framework, run build.sh.
You might want to tweak your
.gitignoreto ignore the Carthage build artifacts. All files can be committed safely, but Carthage has documentation regarding what should always be committed and what can be ignored, depending on your requirements. If you ignore theCarthagefolder, you will have to runbuild.shin your CI.
Fixing up the bindings
In Visual Studio, right click on the project, select Add existing files and pick ApiDefinitions.cs.
Then, right click this file and select Build Action > ObjcBindingApiDefinition.
Open ApiDefinitions.cs and make the following changes:
- Delete the first
Constantsinterface and its attributes. - Remove any
[iOS (10,0)](or any version) attribute
Linking the XCFramework
In the BatchSDK.iOSExtension project, right click on Native References and select Add.
Locate BatchExtension.xcframework in CarthageDeps/Carthage/Build and add it.
Right click on the newly added reference and select Properties (you might need to left click it before due to a Visual Studio bug). In the drawer, change its Kind from Static to Framework and make sure Smart Link is disabled.
Finally, you will need to modify the project definition to fix an issue with XCFrameworks:
- Right click on
BatchSDK.iOSExtensionand selectEdit Project File. - Locate the
ItemGroupXML node containing the XCFramework. - Add the following code below that node. The new tag should be as the same level as the
ItemGroup, not in it.
<PropertyGroup>
  <NoBindingEmbedding>true</NoBindingEmbedding>
</PropertyGroup>
Save the file, wait for Visual Studio to reload it and build the project.
Creating the extension
You can now create the extension project.
Add a new project and pick the iOS > Extension > Notification Service Extension kind. You can name the project however you want.
Then, add a reference to the BatchSDK.iOSExtension project.
In NotificationService.cs, make the following changes:
- Add
using BatchSDK.iOSExtension - Remove everything from
NotificationService's implementation: the class should be empty. - Change
NotificationService's base class toBAENotificationServiceExtension.
Build and run your project: Rich Push notifications should now be working.