Legacy documentation
Adding permissions
Batch is compatible with Android 4.0.3 (API Level 15) and higher.
Batch requires only one permission: Internet access. You need to ensure you have it in your manifest otherwise Batch will not start correctly.
<uses-permission android:name="android.permission.INTERNET" />Batch performs better with the Google Play Services library, which improves user targeting. We strongly recommend that you include it in your project in order to enhance offer delivery.
To include the library, follow Google's instructions: How to include Google Play Services library.
If you use the modular Play Services, you will need the following modules:
- base
- gcm (for Batch Push: version 9.2 or higher)
- ads (for Batch Unlock: optional, but improves reliability of the restore feature)
Batch will log a warning if you don't have Google Play Services included in your app.
Integrating the SDK
Complete your build.gradle file:
compile 'com.batch.android:batch-sdk:1.11+'Exact version numbers can be found in the changelog
React Native users
While we don't have an official SDK for React Native, Batch works well in Native Android modules!
Proguard rules
If using an old version of the SDK (<1.10.2), or using eclipse, you might need to add Batch's proguard exclusions yourself:
-keep class com.batch.** {
  *;
}
-keep class com.google.android.gms.** {
  *;
}
-keep class android.support.v7.app.** {
  *;
}
-keep class android.support.v4.** {
  *;
}

-dontwarn com.batch.android.mediation.**

-dontwarn com.batch.android.BatchPushService
Your first start
You are now ready to implement the main functions of Batch setConfig, onStart, onStop, onDestroy, and onNewIntent into all of your activities. A nice way to do so is to make a base activity that all of your activities will extend, and implement Batch here.
The setConfig function should be called only once during your application lifetime to set up the SDK. If you work with one activity, you can add it to the onCreate of that Activity, otherwise the onCreate of your Application will function properly as well.
IMPORTANT
If you don't integrate Batch in ALL of your activities, we cannot guarantee that all features will work properly.
In your Application:
public class YourApp extends Application
{
	@Override
	public void onCreate()
	{
		super.onCreate();

		Batch.setConfig(new Config(YOUR_API_KEY));
	}
}
YOUR_API_KEY is your Batch Dev or Live API key. You'll find the API keys needed to set up the SDK in ⚙ Settings → General:
- Dev API key: Use it for development or testing purposes. This API key won't trigger stats computation. Please take care not to ship an app on a Store with this API key.
- Live API key: Should be used in a production environment only and in the final version of your app on the Store.
In a BaseActivity:
// This class is an hypothetic class that all your activities should extend: this is not only your first activity.
// It will usually extend AppCompatActivity rather than Activity
public class BaseActivity extends Activity
{
    @Override
    protected void onStart()
    {
        super.onStart();

        Batch.onStart(this);
    }

    @Override
    protected void onStop()
    {
        Batch.onStop(this);

        super.onStop();
    }

    @Override
    protected void onDestroy()
    {
        Batch.onDestroy(this);

        super.onDestroy();
    }

    @Override
    protected void onNewIntent(Intent intent)
    {
        Batch.onNewIntent(this, intent);

        super.onNewIntent(intent);
    }
}
Troubleshooting
If you're having trouble integrating the SDK, check our troubleshooting documentation.
Testing your integration
Congratulations on finishing the bulk of the integration!
If you want to validate your implementation before proceeding with the Push setup, you can locate the log that Batch posts in your logcat in devmode. After deploying a build to your device, access the logcat through your preferred method, although using Android Studio's method is quite simple:
Batch is running in dev mode (your API key is a dev one)Adding Google Play Services
GCM uses the Google Play Services library. If you haven't included it yet, you must integrate it to continue.
To include the library, follow Google's instructions: How to include Google Play Services library.
Batch uses GCM via Google Play Services, it's not compatible with the old C2DM API. If you app is using C2DM API, you must migrate to GCM via Google Play Services before using Batch Push.
Adding permissions and service
GCM needs 4 permissions to setup push:
com.google.android.c2dm.permission.RECEIVEandroid.permission.WAKE_LOCKandroid.permission.VIBRATE[YOUR-PACKAGE-NAME].permission.C2D_MESSAGE
These 4 permissions will not show up in the PlayStore, so you don't need to worry about users asking about them.
Here's how your manifest should appear with these permissions:
- Eclipse
- Gradle
<?xml version="1.0" encoding="utf-8"?>
<manifest xmlns:android="http://schemas.android.com/apk/res/android"
    package="YOUR-PACKAGE-NAME"
    android:versionCode="1"
    android:versionName="1.0" >

    <uses-sdk
        android:minSdkVersion="8"
        android:targetSdkVersion="20" />

    <uses-permission android:name="android.permission.INTERNET" />

    <permission android:name="YOUR-PACKAGE-NAME.permission.C2D_MESSAGE" android:protectionLevel="signature"/>
	<uses-permission android:name="YOUR-PACKAGE-NAME.permission.C2D_MESSAGE"/>

	<uses-permission android:name="android.permission.WAKE_LOCK" />
	<uses-permission android:name="android.permission.VIBRATE" />
	<uses-permission android:name="com.google.android.c2dm.permission.RECEIVE"/>
If not using gradle/Android studio, be sure to replace YOUR-PACKAGE-NAME with your actual package name, for example: com.google.android. If you're using a gradle based build, the ${applicationId} macro will automatically do that for you.
You must now declare the Batch services and receiver. They will handle notifications and display them for you, without any additional code.
Here's how to declare it in your application tag:
- Eclipse
- Gradle
	<application
        android:icon="@drawable/ic_launcher"
        android:label="@string/app_name"
        android:theme="@style/AppTheme" >

        <meta-data
            android:name="com.google.android.gms.version"
            android:value="@integer/google_play_services_version" />

        <activity
            android:name=".MainActivity"
            android:label="@string/app_name" >
            <intent-filter>
                <action android:name="android.intent.action.MAIN" />

                <category android:name="android.intent.category.LAUNCHER" />
            </intent-filter>
        </activity>

        <service android:name="com.batch.android.BatchPushService" />
        <receiver android:name="com.batch.android.BatchPushReceiver" android:permission="com.google.android.c2dm.permission.SEND">
		  <intent-filter>
		    <action android:name="com.google.android.c2dm.intent.RECEIVE" />
		    <category android:name="YOUR-PACKAGE-NAME" />
		  </intent-filter>
		</receiver>

		<service android:name="com.batch.android.BatchPushInstanceIDService" android:exported="true">
            <intent-filter>
                <action android:name="com.google.android.gms.iid.InstanceID"/>
            </intent-filter>
        </service>

    </application>
If you get an error that looks like "Didn't find class
com.batch.android.BatchPushInstanceIDService", please make sure that your project correctly has a dependency on the play services library, and that it is at least of version 9.2.0.
Enabling Batch push
Activate Batch Push by setting the FCM/GCM Sender ID that you obtained earlier, right before setting the Batch API Key (either DEV or LIVE, in ⚙ Settings → General):
public class YourApp extends Application
{
	@Override
	public void onCreate()
	{
		super.onCreate();

		Batch.Push.setGCMSenderId("YOUR-GCM-SENDER-ID");

		Batch.setConfig(new Config(YOUR-BATCH-API-KEY));

	}
}
Be sure to setup Batch Config and Push related configurations in your Application onCreate, not in an Activity. This is important because when you receive a notification, your activity may not be initialized.
HIGHLY RECOMMENDED
- Please [read this guide](/android/advanced/low-level-notification-handling) if you are working with a custom Push implementation.
- Follow the [Customizing notifications](/android/advanced/customizing-notifications#setting-up-custom-push-icons) guide to display your notification icon correctly and manage other aspects of your notification *(accent color, etc)*.
Your first notification
1. Obtaining your device token
You can find your device's token using the debug tool or locating the token Batch posts to the logcat (see here to know more):
D/Batch (20509): Batch.Push: Registration id: X2. Sending a test push
Important: You will need to find and save your device token first to send your first test notification (know more here).
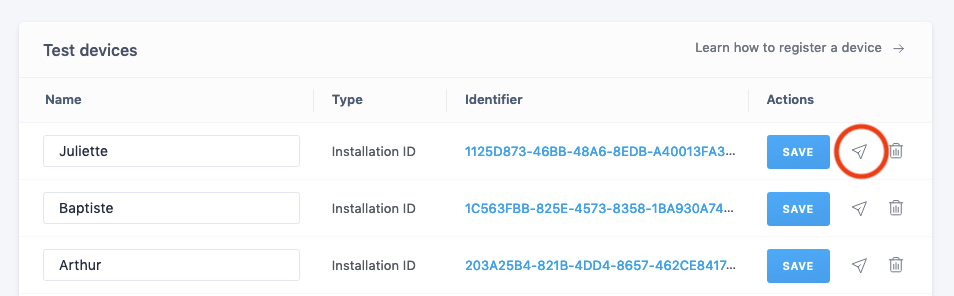
You can click the "Send a test" button to see how your message looks on your device, test your deeplink or see if the Mobile Landing is displayed correctly.
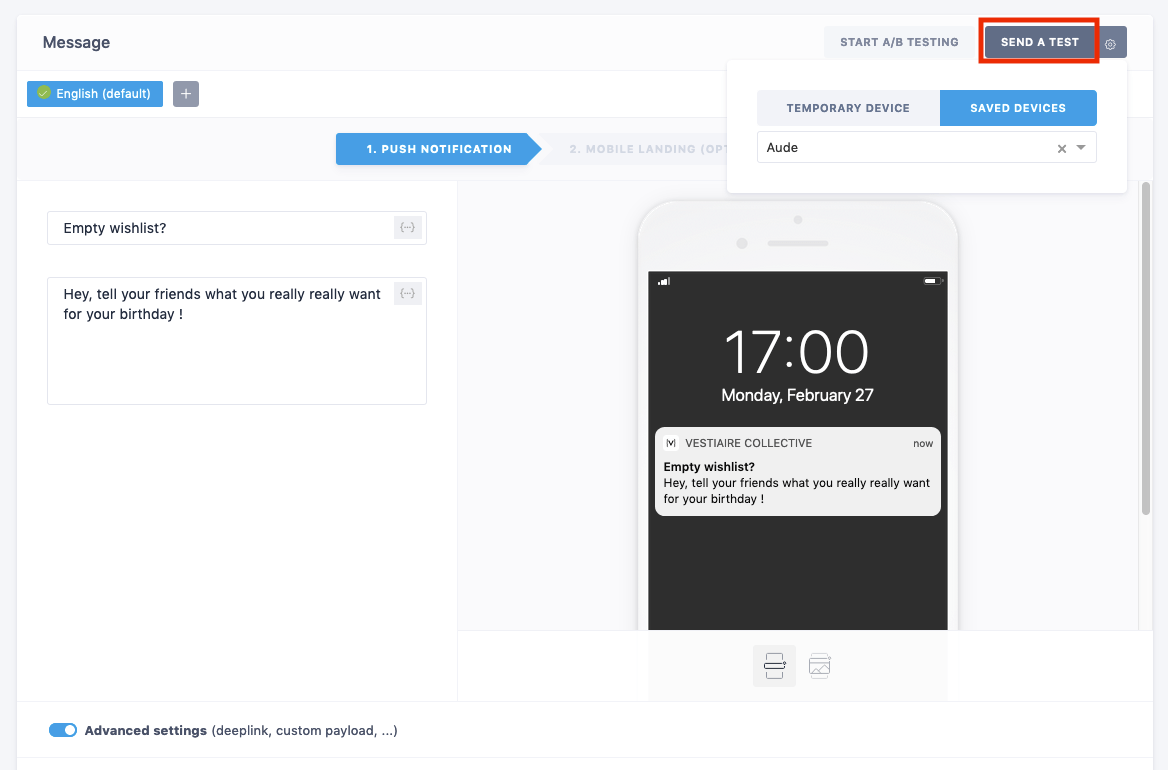
You will find the list of all the registered test devices from Settings > Push Settings and send them a test message. This is helpful to check if the token of your saved devices are still valid and delete them if it's not the case.
Troubleshooting
If you're having trouble sending test notifications, you can check our troubleshooting documentation.
What's next
Congratulations on finishing the integration of Batch Push!
Here are a couple of extra steps you can take before releasing your app:
- Live API key: Ensure you don't use Batch's DEV API key in the build you will upload to the Play Store.
- Small icon / Accent color: Make sure the small icon you are using is opaque white. We also recommend you use an accent color. You will find more information here.
- Mobile Landings: Make sure Mobile Landings are set up correctly.
- Custom user identifier: Add support for custom user identifiers if you are planning to use the Transactional or the Custom Data APIs.
- Token import: Import your existing tokens if you're coming from another push provider.